Transferring domains can be a daunting task, but if you can follow the process of what happens it may help in making the process a little less stressful. There are 5 basic steps in transferring a domain name. If you’re uninterested in the process and just want it transferred away from your current registrar (and hopefully to ours) you can scroll to the bottom where you’ll find links to specific instruction for moving your domain away from top domain registrars. It can be a little frustrating and annoying but (most of the time) the first three steps are something you’ll have to handle by yourself before your current webmaster (or us) can do anything…
Step 1: Unlocking / Turning Off Domain Protection:
When you first purchase a domain it usually becomes ‘locked’ right away. This prevents any accidental transfers of the domain and ensures no one steals the domain from you. Domain registars like Godaddy call it being “Locked” while Network Solution’s calls it “Domain Protect.” Services from Register.com require you to actually call to unlock your domain.
Usually if you look at the admin section of your domain registrar you can find what you’re looking for. Don’t forget a search engine can also help to find the specific instructions for a specific registrar.
Step 2: Check your Administrative Contact
This step is extremely important and often overlooked. When you submit to have your domain transferred it will send a verification email to the Administrative Contact of your domain name. Many domain names were bought years ago and sometimes people don’t have access to that specific email account or don’t even remember what it was. This can bring the whole transfer process to a screeching halt. So the next step is to check and make sure your administrative contact is correct!
 The easiest way to do this is to is to:
- Visit WhoIs.com
- Type in the website name you’re trying to transfer
- The ‘results screen’ will show your domain name as ‘taken’ but click on the link that says ‘Whois’
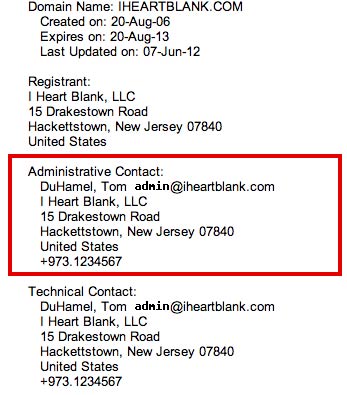
- The next screen will have a bunch of stuff that probably won’t make sense to you, but pay attention! About half way down you’ll see a section called “Administrative Contact,” and that is essentially where the verification email will go to.
So what do you do if you don’t have access to this email account?
If you bought your domain name:
If you don’t have access to this email anymore you will need to log-in to your registrar (ie – GoDaddy, Network Solutions, etc.) and change the email address.
If your webmaster / administrators e-mail is in there:
You can either make them aware that they will have to authorize the domain transfer or you can ask them to change the Administrative Contact email address to one you have access to.
Step 3: Request your ‘Authorization Code’ or ‘Transfer EPP’
All right we’re getting real close. The last ‘preparation‘ step to do is request an Authorization Code. This is the code you give to your new domain registrar to authorize your account. Some Registrars, like GoDaddy, call it an “Authorization Code” while others, like BlueHost, call it a “Transfer EPP.” Other registrars actually make you call them for the Authorization Code…most likely so they can try to keep you at their service. Most of the time you’ll ‘request’ the Authorization Code and receive it via e-mail.
Below you’ll find a list of instructions from the top domain registrars for requesting your Authorization Code or Transfer EPP:
After you’ve received your code, make sure you keep it in a safe place as you will need it when actually transferring the domain.
Step 4: Actually Transferring The Domain
Now you’re at the point where you (or your webmaster) can register for the domain transfer. Every registrar may be a little different but the principles are the same. I’m going to take you through the process of transferring a domain with www.yournextdomainname.com (via I Heart Sites.)
The first step is to simply buy the transfer, or tell your webmaster that you’re ready to transfer! After you’ve checked out and paid a fee for the transfer the wheels will be in motion. Your new Domain Registrar will send an email to the Administrative Contact (see Step 2.)
There is a 2-step process to actually authorizing the domain for transfer:
- You will need to click on a link in that email (to the Administrative Contact) to ‘accept’ the transfer
- You will need to enter your Authorization Code (See Step 3)
So basically steps 1 – 3 just got you prepared for a simple little thing in Step 4. All right…home stretch and the next part is super easy…
Step 5: Wait 5 Days or ‘Auto-Accept’ the Transfer
Now you basically have to wait 5 days for the transfer to go through. I know that GoDaddy has an ‘Auto-Accept’ feature that just puts the domain right through. I’m not positive what every domain registrar has an auto-accept feature. You’ll have to see.
Conclusion
That’s the basic ‘ins and outs’ of a domain transfer. I’ve been having a lot of stupid problems with them recently. To help you (and me) get through the process quicker I have also done searches for transferring away from domain names of a number of Domain Registrars. You can check out the list below. Good luck!!!